Saturday, November 29, 2008

Tips

Went to an exhaust shop this morning to weld on bigger tips for the muffler. Its ironic really, here in Singapore, we can get our hands on every possible exhaust system from Japan with minimal lead times and the only option I have is this. No thanks to our country's policies on approved exhausts. Its a hefty fine if you're caught with one thats not homologated. Due to its low demand, there's currently NO approved exhausts for the NC, so that about limits my options to zero. No autoexe, HKS or Blitz pipes for me. =(

I was undecided about just getting bigger tips or going for some of those titanium tips with the bluetorched look. In the end, I stuck to convention.


Well, I'm kinda liking the look actually.

I also had HIDs done, though I did not took any pictures of the new lights. I'll probably post them up when I have the chance. Being a base model, my car did not come with HIDs, I was on the normal H7 halogens, so I had to look around for a HID conversion kit. The installation was tough, as anyone who had ever taken a look at the NC's engine bay would attest. Its a good thing I wasn't the one doing it!

Wednesday, November 26, 2008

Down Memory Lane

Was posting some pictures on photobucket when I happened to chance upon some pictures of one of my previous cars. I guess these pictures must have been in photobucket for close to 8 years. I've forgotten all about them and its nice to see them again


A friend took this picture. The intercooler is photoshopped. My car is NA.


Neons were quite the rage then. Practically (almost)everyone had them. Now I think its an extremely "ricey" thing to do.


This is a picture me and 2 other friends with identical silver imprezas took. Everyone's moved on since then.


Sadly, these are about all of what's left. I really do wished I had taken more pictures. I didn't even take any of the first car I've ever owned.

This is one of my favourite Mazda3 shots.


Sunday, November 23, 2008

Rain

Took the time out to wash the car today. It has been a bad week. It's been raining sporadically and I didn't want to wash the car when it could rain any moment. Woke up in the morning and the sun was shining, turns out just a few hours after I'm done, the heavens opened up again.

Anyway, I did manage to snap some better pictures of the car before it started to rain.

Front shots


Close up shot


Side profile shots


I like this pic.

Rear views


If you look closely, you can actually see my reflection in the bumper. I took this picture without having a clear idea of where exactly I was pointing at. Good thing it didn't turn out too badly.

Saturday, November 22, 2008

Au-tobahn!

Fixed up the kit today. The more I think about it, the more I feel I shouldn't have ordered the full au-tobahn kit. The sideskirts look almost identical to the stock ones. They're just a wee bit bigger, thats all. Could have saved some money for other stuff.

If you look at the picture, there's just a little bit of a bulge near the end. Thats about it. Oh well. I guess its the little details that makes all the difference.

Here are some pictures.


Hanging out to dry!


Here you also see an S15 and a AE86 in the background, both getting a widebody conversion, among other things. The silvia is a work in progress, but I was lucky to catch the Levin, which was receiving the finishing touches just as I arrived. The Levin was on a set of Works Equips with some unbelievable offsets. Close to half the wheel was out the fender!

Anyway, here's a side view picture of the au-tobahn front lip.

It seems from this picture there are some imperfections on the edges of the lip. Those aren't paint, but blemishes on the kit itself. Apparently the paintshop did not find it in themselves to smoothen these out before going ahead with the paint job. It seemed like such a simple thing to sand down the kit thoroughly that I am surprised, and more than a little bit puzzled why they will neglect to do this. In any case, the paintwork looks good with the exception of the edges, so I suppose I can live with it, since its not that obvious.


Here's the front view of the car. With the exception of the enormous cavity above the wheel, I think I have got almost all the appearance stuff covered. This is pretty much the final incarnation of my ride. I am probably going to be looking at my suspension options come next year. Current projects I have planned will be some miscellaneous stuff, such as stickers, exhausts tips and HID. I'm probably going to be changing certain bulbs to LEDs but I'm still on the fence with regards to that one.

The car is kind of dirty currently, so I didn't take more pictures. I'll post more pictures of the car tomorrow, after I've had the chance to give it a good wash.

Friday, November 21, 2008

Its here!

Finally, the long awaited au-tobahn kit has arrived. It took about close to 2 months to get it. I have a strong feeling I might be the one and only au-tobahn-kitted MX5 on the island.Haven't seen any around so far. Anyway, I was surprised when I went down to the shop to get it. The whole kit came in a box thats the size of a door!

Here are some pictures of the parts in the flesh. I didn't take any pictures of the sideskirts though.


I collected them yesterday but since it was already late, I didn't get to send them to a paintshop. The parts are still sitting in my sister's car as of now. I'll probably drop them off to be painted tomorrow.

Wednesday, November 19, 2008

Appearance package!!

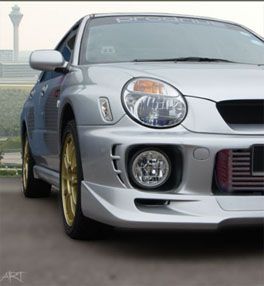
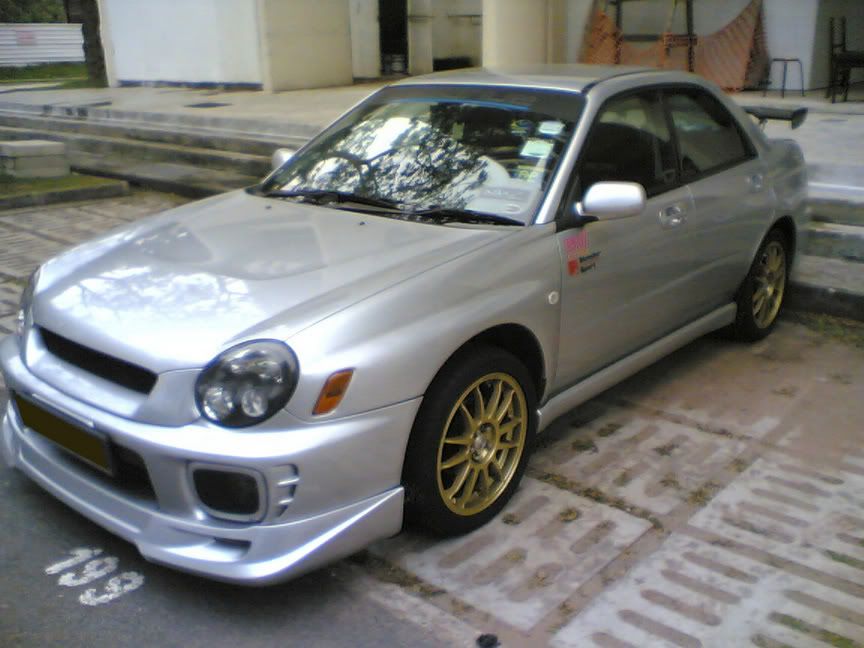
Once the ICE project has been sorted out, it was time for a facelift. I had a hard time looking through all the bodykits available for my ride,as there were more than a few available. To be perfectly honest, this one below is my favourite.
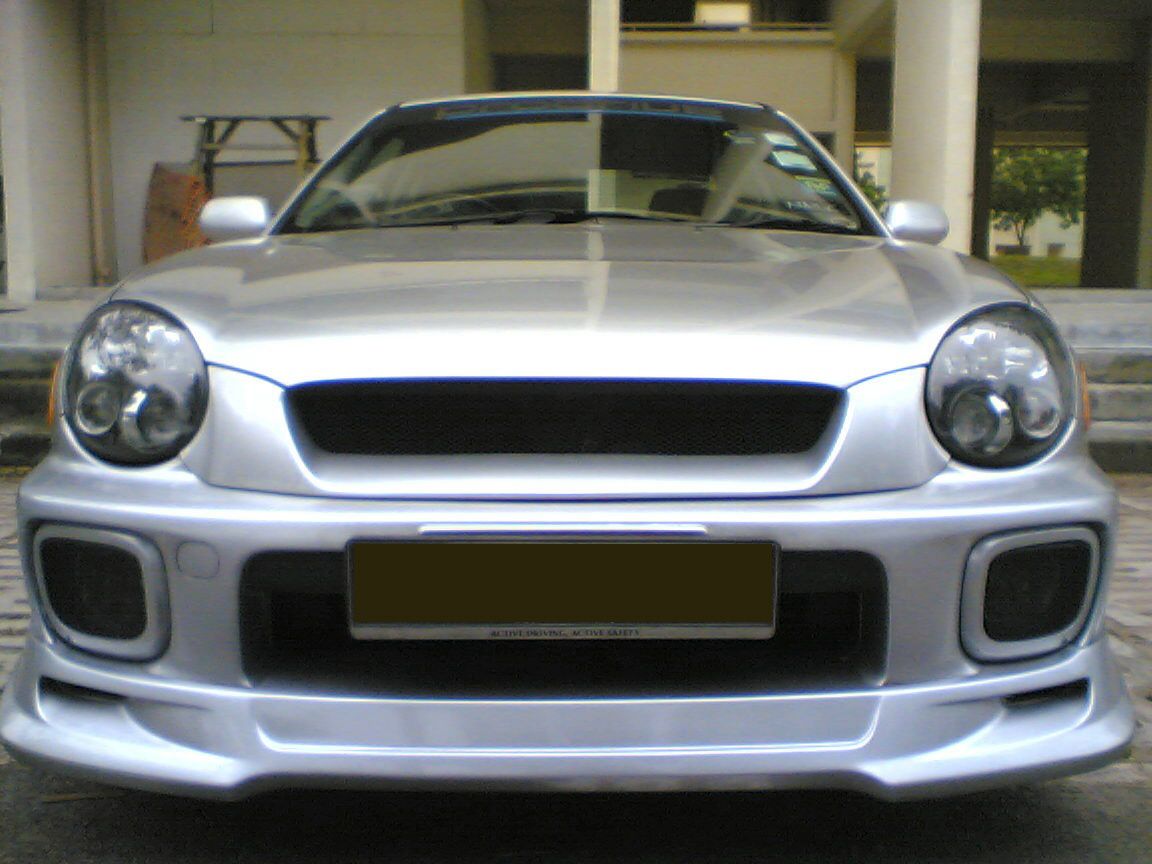
Followed closely by this one:
The unbelievably exorbitant price of the Mazdaspeed kit worked enormously against me going for it. That coupled with the fact that I have no place to store an extra bumper makes the Au-tobahn kit very appealing. And that was what I ordered. Order was placed sometime in the mid of September. I've just received word that the kit has arrived and I'll probably be picking it up this weekend. More real life pics will follow as soon I have these parts painted and fixed.

I also ordered the billet grille from gomiata, an ebay vendor. That took slightly more than 2 weeks to arrive, and I was anxiously awaiting its arrival the whole time. Indeed, I was not disappointed with the product. Here are some pics:
The package arrived securely packed with bubblewrap as well as some paper stuffing. On first feel, the grille feels very solid to the touch and very well-made. Its strange that the instructions that accompanied the grille was by Robert's Autosports instead of gomiata. The instructions, by the way, is the only thing I feel can be improved in this package. The grille comes with custom fittings and its not exactly easy to find out how these go in with the aid of the instructions, as there are no pictures at all, just words. Its not exactly hard to figure out, but I think some step-by-step pictures would have been nice.
Here's some pics of it installed.

I think the grille accentuates the car superbly. Although I do think it could be more secure if it actually replaces the stock black plastic cover, instead of attaching on top of it. It does have a bit of that Aston Martin feel, and I do admit that's one of the reasons I went for it in the first place. However, i think its far more subdued, quite different from this picture below.
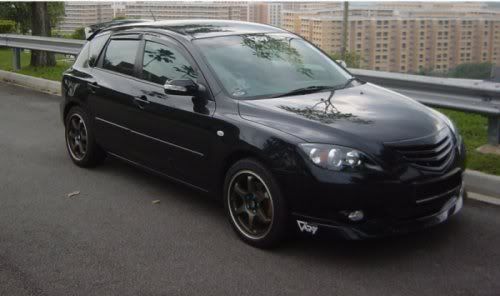
Don't get me wrong, I think the Damd kit looks fantastic, but its just a bit over the top for my taste. I do think there are a few of these running around our little island though I have not personally had the opportunity of seeing one up close in the flesh.

Next up would be footwear. Its basically a tossup between these two.


On the left is the GC-010E by Prodrive and the other rim is the SA-67R by Weds Sports. Just looking at these two pictures will show some hint of my requirements. I wanted something that's gunmetal/grey, matt and multi-spoked. I liked the Weds design, it reminds me a lot of the stock wheel from the facelifted RX-8, which I think is one of the nicest looking stock rim out there.
Not hard to see why, is it?

The Prodrive however, has a timeless design. There are a few similar variants out there, from OZ's ultraleggara to Volk's CE-28NF. But there's just something about the Prodrive that makes it a little bit different. Its a mystifying thing that I can't quite place. Its also a forged monoblock , as compared to the Wed's casted piece, so that was another plus point.

Rims came on a good day, bright and sunny.
Was excited when I got the call from the wheel shop that my rims are in the house. Headed on down and my heart skipped a beat when I saw four Prodrive boxes stacked in a corner. I ordered 18x8, so I was anxious to know how heavy the wheels are. I was relieved to find that they weren't as heavy as I thought. I didn't weight the rims, but they felt lighter than they looked. A check online seems to suggest they are weighing in at about 8kg a piece, which I think isn't too bad for an 18" rim.


Some more pics.

As for rubbers, I was looking for Yokohama S-Drive or something along the lines. I wasn't considering high performance tires like the Neova AD07 or the Toyo T1Rs as that was not my objective. I wouldn't have went for 18 if this was the case. In the midst of doing my research, I found myself looking at another option, the Firenza st-08.
Kinda easy to figure out why. Look harder at the picture if you still don't get it. Apparently there was a lawsuit by Yokohama to stop the sale of st-08s in Japan due to this picture above. Now, I'm not sure if the similar threading is more or less it, but I guess the compound shouldn't be too far off if Yokohama bothered to file a lawsuit against Sumo. In any case, the price difference is quite impressive so it was a no-brainer decision for me. Now only time will tell if these serve me well.

Monday, November 17, 2008

ICE part 2

Getting the gear is only half the game, the goal lies in getting everything installed in the car. And a coupe is not exactly the best car for an ICE project, its small, dashboard is near and the windshield slopes too much. Kinda hard to achieve a natural wide soundstage. But then again, I am not exactly building a sound competition car.

First up, I've got to figure out where to place the tweeters. It will definitely be up on the dash, only problem is, I couldn't figure out if I'm going with an integrated tweeter pod within the A-pillar setup, or if a custom tweeter enclosure is the way to go. These are some pics of how the tweeters were set up in my previous ride.
I liked this implementation. It looks integrated and very stock though one downside is that once the pillars are fibreglassed, the driver positions were pretty much fixed. No mucking around or sudden configuration changes possible. It also takes quite a while to do. In the end, I decided to go with a more fuss-free option for the roadster.
Over here you see the test fit for the custom tweeter pod I will be using. Fits like a glove. The end product will be anodized matt black and that only went through once I was satisfied that the fit and wirings have no problems and was assured that there will be no issues with the end-product.

Next up would be the midrange drivers as well as the midbasses. There weren't much choice I had to begin with, and it was a good thing that the stock tweeter location could fit the midrange so nicely. On the left you see a picture of the stock tweeter cover removed and the midrange driver fixed on. There are wooden holders behind the panels to hold the speakers in place but externally, this is about as stock as you can get. In the second picture, you get a better idea of how everything looks like. You can also see the finished tweeter pod in that picture. Midbass drivers are hidden behind stock speaker covers. I did thought about doing an exposed midbass mounting, something like the picture below. But decided against it in the end, as I wasn't too certain about speaker integrity of such an installation.
Three layers of sound proofing went into those door panels as well, They damped the door critically and also has an added side effect of creating a nice thud sound on closing the door.
It also took about 30 meters of speaker cable to wire up all these drivers to the amplifers, which i think is an unbelievable amount of cable, seeing that the car isn't very long to begin with.

See the picture on the left? There are a few more pages of that in my notebook. Planning didn't get much simpler even after I have decided on the amps. To be honest, I was fretting over the small details. I know the amps can fit in that tiny well in the boot, main issue is HOW. I didn't want to just throw in the amps and call it a day. Everything has got to sit NICELY. I had a few preferred layouts and although they look more or less the same, I gotta admit it was kinda fun moving stuff around to see what kind of effect I can achieve.

These are pictures of the first test fit I had.

This would have been the preferred layout if I had not neglected to take into account the length of the wires as well as connectors. There is no way I could have spared another millimeter of space to accommodate the fuseblock. That's how tough it is to get an ICE display going on in an MX5.

Here you see the second test fit with the cable and connector lengths taken into account. I sorta kicked myself a bit at that point, as I realized the ridiculously long plugs the cable guy used when he was terminating the cables. In any case, that's about the only boner I have with this layout.

Here you see some pics of the completed product.

In this picture you see how the wires are configured. The two amplifiers are identical, both putting out 4x150W RMS power. However one is wired bridged to deliver 2x300w RMS to both midbasses and the other remains in 4 channel mode. You can also see the annoying proprietry connector that Alpine uses for its speaker connections. There's a piece of acrylic embedded with LEDs underneath the amps as well, although its not too visible in this representation.


Some more pictures of the setup. The amps take up the entire indentation in the boot. You can also see that the entire floorboard of the boot has been rewrapped in PVC for a more discreet look.

Some night shots. Not exactly very well done. I'm using my phone camera for all these images and I guess there's a limit to what it can do in the dark.

I'm on Facebook!